Make Your ML/DL Model Android/iOS Ready!
- Mayuresh Madiwale
- Sep 10, 2022
- 3 min read

Source: tensorflow.org
If you are following the past articles, you should have your Deep Learning model ready and working. Let's take this a step further and make the model android ready in order to make an application on your device. In this post we will see how to make the model that supports the Android OS and works perfectly without compromising the accuracy.
Here we will be using TensorFlow Lite format which is best suited for our application.
But What is TensorFlow Lite ?
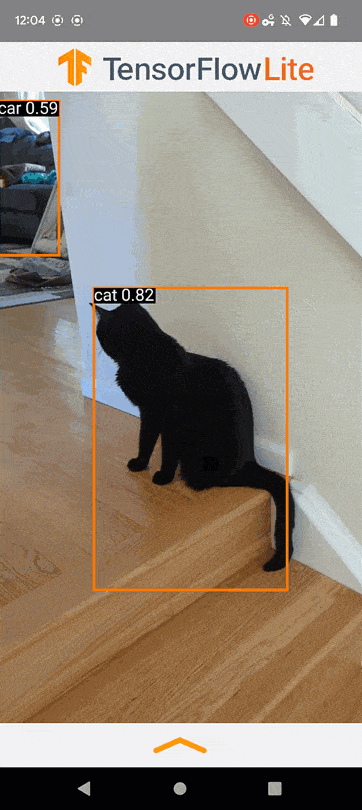
TensorFlow Lite is an open-source, cross-platform framework that provides on-device machine learning by enabling the models to run on mobile (Android and iOS), embedded systems and IoT devices developed by TensorFlow. It is optimized for on-device machine learning, by addressing 5 key constraints:
Latency (there's no round-trip to a server),
Privacy (no personal data leaves the device),
Connectivity (internet connectivity is not required),
Size (reduced model and binary size),
Power consumption (efficient inference and a lack of network connections).

Source: learnopencv.com
Optimizing the TFlite model

While the basic TFlite format is efficient, there are some other types of optimizations (or Quantization) available within the TFlite.
These are:
Float 16 Quantization
Integer Quantization
Dynamic Range Quantization
Out of these, F16 and Dynamic range methods are used alot.
Post Training Quantization
As the name suggests, the trained model format such as "H5" have great at accuracy but tend to have large file size and this format is not compatible with Android/iOS. Thus we will convert the model to our required format and see if that is doing the work as intended or not.
Converting the H5 to TFlite Float 16 Quantization
Here's the code snippet to convert your H5 to TFlite with Float 16 Quantization
converter = tf.lite.TFLiteConverter.from_keras_model(my_model)
converter.optimizations = [tf.lite.Optimize.DEFAULT]
converter.target_spec.supported_types = [tf.float16]
tflite_fp16_model = converter.convert()
with open('/content/my_model.tflite', 'wb') as f:
  f.write(tflite_fp16_model)
To evaluate the converted model, firstly we will have to make a function to store image label and images in a list accordingly. Follow the code below.
test_images = []
test_labels = []
for image, label in test_dataset.take(len(test_dataset)).unbatch():
  test_images.append(image)
  test_labels.append(label)
After this, we will make a function that will interact with the model and return the accuracy as output.
def evaluate(interpreter):
  prediction= []
  input_index = interpreter.get_input_details()[0]["index"]
  output_index = interpreter.get_output_details()[0]["index"]
  input_format = interpreter.get_output_details()[0]['dtype']

  for i, test_image in enumerate(test_images):
    if i % 100 == 0:
      print('Evaluated on {n} results so far.'.format(n=i))
    test_image = np.expand_dims(test_image, axis=0).astype(input_format)
    interpreter.set_tensor(input_index, test_image)

    # Run inference.
    interpreter.invoke()
    output = interpreter.tensor(output_index)
    predicted_label = np.argmax(output()[0])
    prediction.append(predicted_label)

  print('\n')
  # Comparing prediction results with ground truth labels to calculate accuracy.
  prediction = np.array(prediction)
  accuracy = (prediction == test_labels).mean()
  return accuracy
After this, we are able to evaluate the model on basis of Test Dataset and see the accuracy.
Following snippet will help you to do so.
# Passing the FP-16 TF Lite model to the interpreter.
interpreter = tf.lite.Interpreter('link to your TFlite model')
# Allocating tensors.
interpreter.allocate_tensors()
# Evaluating the model on the test dataset.
test_accuracy = evaluate(interpreter)
print('Float 16 Quantized TFLite Model Test Accuracy:', test_accuracy*100)
You should see the output something as shown below.

Converting the H5 to TFlite Dynamic Range Quantization
Code Snippet is as follows
# Passing the baseline Keras model to the TF Lite Converter.
converter = tf.lite.TFLiteConverter.from_keras_model(my_model)
# Using  the Dynamic Range Quantization.
converter.optimizations = [tf.lite.Optimize.DEFAULT]
# Converting the model
tflite_quant_model = converter.convert()
# Saving the model.
with open('/content/dynamic_quant_model.tflite', 'wb') as f:
  f.write(tflite_quant_model)
Similar to F16, here we will evaluate the model on Test Dataset
# Passing the Dynamic Range Quantized TF Lite model to the Interpreter.
interpreter = tf.lite.Interpreter('/content/dynamic_quant_model.tflite')
# Allocating tensors.
interpreter.allocate_tensors()
# Evaluating the model on the test images.
test_accuracy = evaluate(interpreter)
print('Dynamically  Quantized TFLite Model Test Accuracy:', test_accuracy*100)

Looking for the best from above...
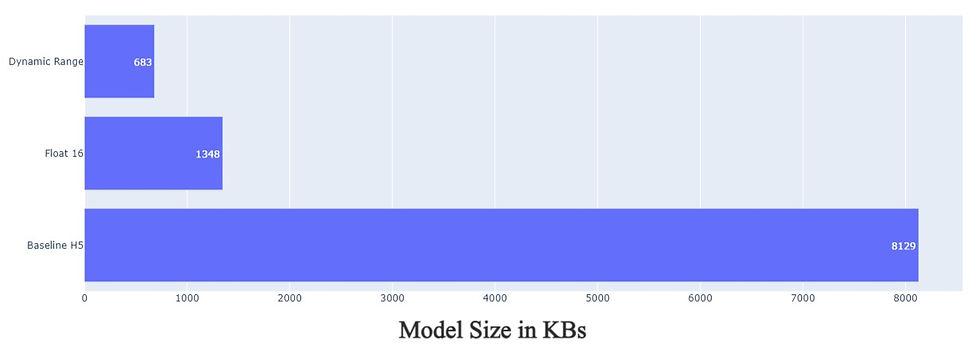
We have made the models that are ready to be further processed to deploy on your Android/iOS device. But first let's see which one of them is suitable to be deployed. To do this we will evaluate them on the basis of Accuracy and Model size. We will choose the one with highest accuracy and lowest size. Following graphs will help us visualize the same.


Final Thoughts
Deploying ML/DL models on hand held devices is possible with TFlite.
Process of converting H5 model to TFlite is easy and efficient.
Optimizations are available in TFlite to further enhance the performance.
Float 16 method is best suitable method in this example.
Model Accuracy and Size parameters are optimized in Float 16 method.
What's Next?
The further process of actually designing an application can be done with the help of the following guide from Google:
. . .
Thank You !!!


Comments